Use Netbox as backend for Oxidized
- June
- 24
I had been keeping the databases separate for netbox and oxidized so thought I would integrate the two. The information on how to do it was a bit scattered so I'm documenting it here.
┬Ā
First of all, netbox has the interfaces we need to interface oxidized directly without the need of any external scripts. There are three parts that need to be built:
┬Ā
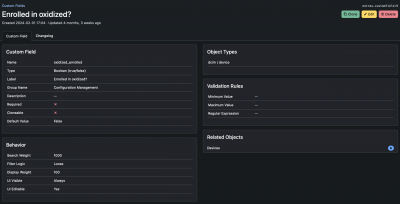
1. Come up with a query that can be used against the netbox api that will yield the hosts you want to monitor in oxidized. My use case has stacked switches and the netbox REST view for virtual chassis doesn't have a hostname. So instead I decided to do it in a more atomic way by using a custom field on the device. That gives me a simple way to turn oxidized configuration management on and off for any device. For a switch stack I simply turn it on for the master switch element.
┬Ā
┬Ā
I also added a custom field for the DNS name. You may be able to use your device name instead depending on your setup.
┬Ā

┬Ā
2. The second part of the config is in oxidized. Fortunately oxidized has an http interface that can read the netbox data directly.
You'll need to generate an api token in netbox first. So navigate to Admin, API Tokens, click Add and create an appropriate key. You may want to create a user that just has read-only permissions to the device data for security.
┬Ā

┬Ā
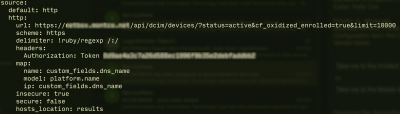
Next we must configure oxidized for an http source. Here is the relevant portion of the oxidized config file:
┬Ā
┬Ā
Important to note is that when calling the netbox REST api you embed cf_oxidized_enrolled as a filter and also test to make sure the device is active. The last URL parameter is needed if you have more than 50 devices because the netbox api will only return up to 50 results by default.
┬Ā
The part below the map: specifies which fields oxidized "maps" to its own fields. Here I use my custom field for both the name and ip address. I use the platform name as the model; that's a standard field in netbox. If you think you want to map different fields, remember that you can view the api data formats pretty easily by visiting https://your.netbox.url/api and then drill down to the dcim/devices section and look at the output. You can also test your filter that way. NOTE: the field you use for model must match a defined model in oxidized.
┬Ā
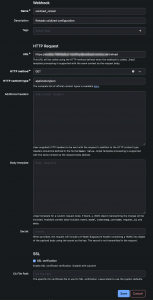
3. The final step is to create a trigger that will make oxidized refresh its device database when a device is added, removed or modified. We do that in netbox. Create a webhook (Operations, Webhooks, Add) and fill in the fields. The URL field will be your oxidized URL with /reload appended.
┬Ā
┬Ā
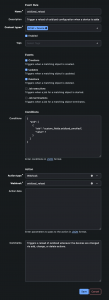
To make sure we only trigger an oxidized config reload when we're modifying a relevant object, we can set an event rule (Operations, Event Rules, Add):
┬Ā
┬Ā
Test everything and make sure you can add/delete a device and trigger a reload.
That's it!
Integrating Ansible with Hashicorp Vault
- December
- 15
There are several moving parts of this configuration. WeŌĆÖre using a simple example here; your implementation may have different requirements.
┬Ā
First, vault should be installed and working in a production configuration. For these examples we have the root token in our possession. You may not need this for your deployment if you have the correct permissions already assigned to your local account.
┬Ā
To use these examples you will need hvac python library and community.hashi_vault collection installed. Install hvac library with ŌĆśpip install hvacŌĆÖ. Install the community package with ŌĆśansible-galaxy collection install community.hashi_vaultŌĆÖ.
┬Ā
You can use Hashicorp Vault to store all the sensitive variables you use with ansible. However, you still need to have a credential to authenticate ansible against vault. We will explore using a token or alternatively a username/password against an LDAP (Active Directory) backend for authentication.
┬Ā
When using vault from the command line you can use a token from an environment variable, or you can specify your username and you will need to type your password. Generally, you will only use this to write variables for ansible to read. You can also likely do it through the vault GUI if you have set that up.
┬Ā
When running ansible plays, the token or username and password can be set as environment variables manually or from your .profile or .bashrc if you wish. Obviously, itŌĆÖs more secure to set them manually for your session and not store them on the server.
┬Ā
LetŌĆÖs go through storing some key value pairs and setting up a policy to access them. WeŌĆÖll then show how to retrieve them and use them in an ansible playbook.
┬Ā
LetŌĆÖs put our server address and root token into the environment.
┬Ā
$ export VAULT_ADDR="https://vault.example.com:8200"$ export VAULT_TOKEN="hvs.hrlxewcxyxyxyxyxyxy"
Now weŌĆÖll create a token that is valid for a year and can be refreshed every 30 days. We will set the default max lease time for tokens.
┬Ā
$ vault write sys/auth/token/tune max_lease_ttl=8760hSuccess! Data written to: sys/auth/token/tune
LetŌĆÖs create a path for some vmware credentials, weŌĆÖll use the key-value storage version 2:
┬Ā
$ vault secrets enable -path=apps kv-v2
Success! Enabled the kv-v2 secrets engine at: apps/
Now weŌĆÖll put our vcenter username and password in there.
┬Ā
$ vault kv put apps/vmware vcenter_username="administrator@vsphere.local"$ vault kv patch apps/vmware vcenter_password="SomeVerySecretPassword"
Check to make sure you can read them okay.
┬Ā
$ vault kv get apps/vmware
== Secret Path ==
apps/data/vmware
======= Metadata =======
Key┬Ā┬Ā┬Ā┬Ā┬Ā┬Ā┬Ā┬Ā┬Ā┬Ā┬Ā┬Ā┬Ā┬Ā┬Ā Value
---┬Ā┬Ā┬Ā┬Ā┬Ā┬Ā┬Ā┬Ā┬Ā┬Ā┬Ā┬Ā┬Ā┬Ā┬Ā -----
created_time┬Ā┬Ā┬Ā┬Ā┬Ā┬Ā 2022-12-13T22:16:24.625488264Z
custom_metadata┬Ā┬Ā┬Ā
deletion_time┬Ā┬Ā┬Ā┬Ā┬Ā n/a
destroyed┬Ā┬Ā┬Ā┬Ā┬Ā┬Ā┬Ā┬Ā┬Ā false
version┬Ā┬Ā┬Ā┬Ā┬Ā┬Ā┬Ā┬Ā┬Ā┬Ā┬Ā 3
========== Data ==========
Key┬Ā┬Ā┬Ā┬Ā┬Ā┬Ā┬Ā┬Ā┬Ā┬Ā┬Ā┬Ā┬Ā┬Ā┬Ā┬Ā Value
---┬Ā┬Ā┬Ā┬Ā┬Ā┬Ā┬Ā┬Ā┬Ā┬Ā┬Ā┬Ā┬Ā┬Ā┬Ā┬Ā -----
vcenter_password┬Ā┬Ā┬Ā SomeVerySecretPassword
vcenter_username ┬Ā ┬Āvadministrator@vsphere.local
If you only want one value, use the -field parameter to get it:
┬Ā
$ vault kv get -field vcenter_username apps/vmwareadministrator@vsphere.local
Now that we have a few values stored we need to create a policy to allow access to them. Make up a policy file called app-policy.hcl that looks like this:
┬Ā
path "apps/*" ┬Ā {capabilities = ["read"]}
Create a new policy and pull in the file:
┬Ā
$ vault policy write app-reader app-policy.hclSuccess! Uploaded policy: app-reader
Make a token an associate it to the policy:
┬Ā
$ vault token create -display-name app-reader -explicit-max-ttl 8760h -policy app-reader -ttl 720h -renewable
┬Ā
Key┬Ā┬Ā┬Ā┬Ā┬Ā┬Ā┬Ā┬Ā┬Ā┬Ā┬Ā┬Ā┬Ā┬Ā┬Ā┬Ā┬Ā Value---┬Ā┬Ā┬Ā┬Ā┬Ā┬Ā┬Ā┬Ā┬Ā┬Ā┬Ā┬Ā┬Ā┬Ā┬Ā┬Ā┬Ā -----token┬Ā┬Ā┬Ā┬Ā┬Ā┬Ā┬Ā┬Ā┬Ā┬Ā┬Ā┬Ā┬Ā┬Ā┬Ā hvs.CAESIFLCj9VhI2IHzKeTNtMOJGPVxyxyxyxytoken_accessor┬Ā┬Ā┬Ā┬Ā┬Ā┬Ā RJb1xyxyxyxytoken_duration┬Ā┬Ā┬Ā┬Ā┬Ā┬Ā 720htoken_renewable┬Ā┬Ā┬Ā┬Ā┬Ā truetoken_policies┬Ā┬Ā┬Ā┬Ā┬Ā┬Ā ["app-reader" "default"]identity_policies┬Ā┬Ā┬Ā []policies┬Ā┬Ā┬Ā┬Ā┬Ā┬Ā┬Ā┬Ā┬Ā┬Ā┬Ā┬Ā ["app-reader" "default"]
You can confirm the ability to read the secrets:
┬Ā
$ vault token capabilities hvs.CAESIFLCj9VhI2IHzKeTNtMOJGPVxyxyxyxyread
Now that secrets are stored, we can read them with a playbook. In this example we will be accessing a VMware vCenter server. The non-sensitive variables are in a file called vars.yml that looks like this:
┬Ā
---vcenter_hostname: "vcenter.example.com"vcenter_datacenter: "EXAMPLE"vcenter_cluster: "Cluster1"vcenter_datastore: "SAN"vcenter_validate_certs: falsevcenter_destination_folder: "EXAMPLE"vcenter_content_library: "example"vm_template: "linux-ubuntu-20.04lts-v22.11"vm_state: "poweroff"ansible_hashi_vault_url: 'https://vault.example.com:8200'ansible_hashi_vault_auth_method: token
Notice the last two variables defined. They are used by the hashi_vault module.
The last thing to do before running a playbook is to store our token into the expected environment variable like this:
┬Ā
$ export ANSIBLE_HASHI_VAULT_TOKEN=hvs.CAESIFLCj9Vxyxyxyxyxy
We can put together a playbook that uses the credentials from vault. Here is one that powers up some VMs from our inventory:
┬Ā
---- name: start inactive vms┬Ā hosts: localhost┬Ā become: false┬Ā gather_facts: false┬Ā collections:┬Ā┬Ā┬Ā - community.vmware┬Ā pre_tasks:┬Ā┬Ā┬Ā - include_vars: vars.yml┬Ā tasks:┬Ā┬Ā┬Ā - name: get vcenter credentials from hashicorp vault┬Ā┬Ā┬Ā┬Ā┬Ā set_fact:┬Ā┬Ā┬Ā┬Ā┬Ā┬Ā┬Ā vcenter_username: "{{ lookup('hashi_vault', 'secret=apps/data/vmware:vcenter_username') }}"┬Ā┬Ā┬Ā┬Ā┬Ā┬Ā┬Ā vcenter_password: "{{ lookup('hashi_vault', 'secret=apps/data/vmware:vcenter_password') }}"┬Ā┬Ā┬Ā - name: power on┬Ā┬Ā┬Ā┬Ā┬Ā vmware_guest_powerstate:┬Ā┬Ā┬Ā┬Ā┬Ā┬Ā┬Ā hostname: "{{ vcenter_hostname }}"┬Ā┬Ā┬Ā┬Ā┬Ā┬Ā┬Ā username: "{{ vcenter_username }}"┬Ā┬Ā┬Ā┬Ā┬Ā┬Ā┬Ā password: "{{ vcenter_password }}"┬Ā┬Ā┬Ā┬Ā┬Ā┬Ā┬Ā name: "{{ item }}"┬Ā┬Ā┬Ā┬Ā┬Ā┬Ā┬Ā validate_certs: "{{ vcenter_validate_certs }}"┬Ā┬Ā┬Ā┬Ā┬Ā┬Ā┬Ā state: powered-on┬Ā┬Ā┬Ā┬Ā┬Ā loop: "{{ lookup('inventory_hostnames', 'inactive:&ubuntu22', wantlist=True) }}"
As an alternative, a username and password can be used for authentication. In this scenario we will use LDAP (Active Directory) to authenticate the user.
┬Ā
We use our root credential on vault to enable the ldap authentication mechanism on vault:
┬Ā
$ export VAULT_TOKEN=hvs.hrlxewxyxyxyxy$ vault auth enable ldap
Now letŌĆÖs configure the ldap to talk to our domain controller. WeŌĆÖve already built a user called ŌĆśvaultŌĆÖ in active directory so we can bind with that user here. WeŌĆÖre not using any certificates for simplicity, it would be a better idea to use ldaps in production.
┬Ā
$ vault write auth/ldap/config \┬Ā url="ldap://dc01.ad.example.com" \┬Ā userattr="sAMAccountName" \┬Ā userdn="cn=Users,dc=ad,dc=example,dc=com" \┬Ā groupdn="cn=Users,dc=ad,dc=example,dc=com" \┬Ā groupfilter="(&(objectClass=group)(member={{.UserDN}}))" \┬Ā groupattr="memberOf" \┬Ā binddn="cn=vault,cn=users,dc=ad,dc=example,dc=com" \┬Ā bindpass='FNjRdTTzxyxyxy' \┬Ā starttls=false \┬Ā userfilter="({{.UserAttr}}={{.Username}})"
Now that we can authenticate to vault via ldap, we can use ldap groups to set user policy. LetŌĆÖs reuse the policy we built previously and bind it to the vaultusers group:
┬Ā
$ vault write auth/ldap/groups/vaultusers policies=app-reader
LetŌĆÖs log in and test our access from the CLI. WeŌĆÖll make sure we have our server location set in the environment first:
┬Ā
$ export VAULT_ADDR=https://vault.example.com:8200/
Now we log in with username/password:
┬Ā
$ vault login -method=ldap username=ansiblePassword (will be hidden):
Success! You are now authenticated. The token information displayed belowis already stored in the token helper. You do NOT need to run "vault login"again. Future Vault requests will automatically use this token.┬Ā
Key┬Ā┬Ā┬Ā┬Ā┬Ā┬Ā┬Ā┬Ā┬Ā┬Ā┬Ā┬Ā┬Ā┬Ā┬Ā┬Ā┬Ā┬Ā┬Ā Value---┬Ā┬Ā┬Ā┬Ā┬Ā┬Ā┬Ā┬Ā┬Ā┬Ā┬Ā┬Ā┬Ā┬Ā┬Ā┬Ā┬Ā┬Ā┬Ā -----token┬Ā┬Ā┬Ā┬Ā┬Ā┬Ā┬Ā┬Ā┬Ā┬Ā┬Ā┬Ā┬Ā┬Ā┬Ā┬Ā┬Ā hvs.CAESICz0NC0UNUTW1nyxyxyxyxytoken_accessor┬Ā┬Ā┬Ā┬Ā┬Ā┬Ā┬Ā┬Ā jXIisU1vaHRGRkxyxyxyxytoken_duration┬Ā┬Ā┬Ā┬Ā┬Ā┬Ā┬Ā┬Ā 768htoken_renewable┬Ā┬Ā┬Ā┬Ā┬Ā┬Ā┬Ā truetoken_policies┬Ā┬Ā┬Ā┬Ā┬Ā┬Ā┬Ā┬Ā ["app-reader" "default"]identity_policies┬Ā┬Ā┬Ā┬Ā┬Ā []policies┬Ā┬Ā┬Ā┬Ā┬Ā┬Ā┬Ā┬Ā┬Ā┬Ā┬Ā┬Ā┬Ā┬Ā ["app-reader" "default"]token_meta_username┬Ā┬Ā┬Ā ansible
Since ŌĆśansibleŌĆÖ is a member of the ŌĆśvaultusersŌĆÖ security group in AD, you can see that we have the ŌĆ£app-readerŌĆØ policy applied (in addition to default). So letŌĆÖs see if we can read our vcenter credentials:
┬Ā
$ vault kv get apps/vmware
== Secret Path ==apps/data/vmware======= Metadata =======Key┬Ā┬Ā┬Ā┬Ā┬Ā┬Ā┬Ā┬Ā┬Ā┬Ā┬Ā┬Ā┬Ā┬Ā┬Ā Value---┬Ā┬Ā┬Ā┬Ā┬Ā┬Ā┬Ā┬Ā┬Ā┬Ā┬Ā┬Ā┬Ā┬Ā┬Ā -----created_time┬Ā┬Ā┬Ā┬Ā┬Ā┬Ā 2022-12-13T22:16:24.625488264Zcustom_metadata┬Ā┬Ā┬Ā deletion_time┬Ā┬Ā┬Ā┬Ā┬Ā n/adestroyed┬Ā┬Ā┬Ā┬Ā┬Ā┬Ā┬Ā┬Ā┬Ā falseversion┬Ā┬Ā┬Ā┬Ā┬Ā┬Ā┬Ā┬Ā┬Ā┬Ā┬Ā 3
========== Data ==========Key┬Ā┬Ā┬Ā┬Ā┬Ā┬Ā┬Ā┬Ā┬Ā┬Ā┬Ā┬Ā┬Ā┬Ā┬Ā┬Ā Value---┬Ā┬Ā┬Ā┬Ā┬Ā┬Ā┬Ā┬Ā┬Ā┬Ā┬Ā┬Ā┬Ā┬Ā┬Ā┬Ā -----vcenter_password┬Ā┬Ā┬Ā SomeVerySecretPasswordvcenter_username┬Ā┬Ā┬Ā administrator@vsphere.local
Success!
┬Ā
To use username and password credentials in our playbook, instead of setting a token in an environment variable we set our username and password instead:
┬Ā
$ export ANSIBLE_HASHI_VAULT_USERNAME="ansible"
$ export ANSIBLE_HASHI_VAULT_PASSWORD="YouWontEverGuessIt"
We also need to change the line in our vars.yml to specify ldap instead of token auth:
┬Ā
ansible_hashi_vault_auth_method: ldap
Now our playbook will run using username/password against ldap instead of requiring a token.
┬Ā
Update Unifi Dream Machine Pro certificates with automation
- October
- 27
Since I like to use Letsencrypt for my certificates I wanted to have a method to deploy them and keep them up to date on my Unifi Dream Machine Pro. I did some reading and found that the certs are actually in two different places, one for the web GUI and one for the WIFI guest portal.
I used some shell scripting along with make, ansible and a few cron jobs to get it done.
The files that need to be maintained on the UDM Pro are these:
/mnt/data/unifi-os/unifi/data/keystore - this is a java keystore file/mnt/data/unifi-os/unifi-core/config/unifi-core.crt - full chain certificate in PEM format/mnt/data/unifi-os/unifi-core/config/unifi-core.key - key for the PEM cert
┬Ā
I have all my certificate renewals done on a single VM which is much easier to manage than having each server do one. So first step I needed was to copy the certificates to a location that my ansible user could read them when there was a renewal. (they are only accessible by root otherwise). Fortunately, certbot has a hook that can be used to do this. I modified my certbot renewal file in /etc/letsencrypt/renewal/mydomain.com and added a line for the hook:
[renewalparams]
authenticator = dns-rfc2136
account = 656f748e58bf73c472623f243ab7eda1
server = https://acme-v02.api.letsencrypt.org/directory
dns_rfc2136_credentials = /etc/letsencrypt/certbot-rfc2136-credentials
dns_cloudflare_propagation_seconds = 30
dns_rfc2136_propagation_seconds = 90
renew_hook = /usr/local/bin/copy_certs_to_ansible.sh
Of course I have my cron set up to check and run renewals once a day.
30 2 * * * /usr/bin/certbot renew >> /var/log/letsencrypt/renew.log
If the domain actually renews, certbot will execute the renew_hook which is in copy_certs_to_ansible.sh. Here is that script.
#!/bin/sh
#
# Copy the pem versions to ansible certs dir
#
/bin/cp -p /etc/letsencrypt/live/mydomain.com/* /home/ansible/certs/mydomain.com/
#
# Rebuild the java keystore if needed
#
cd /home/ansible/certs; make
#
# Set proper owner and group on all the files
#
/bin/chown ansible /home/ansible/certs/mydomain.com/*
/bin/chgrp ad_admins /home/ansible/certs/mydomain.com/*
You notice the "make" command in the middle. There is a Makefile in /home/ansible/certs/mydomain.com/ that manages the dependencies in order to create the java keystore file. We don't want to simply rebuild it and copy it every day because ansible will then restart the unifi-os service every time. Instead, we only want to regenerate the keystore when the certificate has actually changed. Here is the Makefile from /home/ansible/certs:
#!/usr/bin/make
#TZ="US/New_York"
all: mydomain-com-keystore
mydomain-com-keystore: mydomain.com/keystore
mydomain.com/keystore: mydomain.com/keystore.p12
┬Ā ┬Ā ┬Ā ┬Ā @/usr/bin/keytool -importkeystore -destkeystore mydomain.com/keystore -srckeystore mydomain.com/keystore.p12 -srcstoretype PKCS12 -srcstorepass aircontrolenterprise -deststorepass aircontrolenterprise -alias unifi -noprompt
mydomain.com/keystore.p12: mydomain.com/fullchain.pem mydomain.com/privkey.pem
┬Ā ┬Ā ┬Ā ┬Ā @/bin/openssl pkcs12 -export -in mydomain.com/fullchain.pem -inkey mydomain.com/privkey.pem -out mydomain.com/keystore.p12 -passout pass:aircontrolenterprise -name 'unifi'
And finally is the ansible playbook that keeps the certificates up to date. I have the UDM Pro defined in my ansible inventory like this (udmpro.yml):
---
all:
┬Ā hosts:
┬Ā children:
┬Ā ┬Ā udmpro:
┬Ā ┬Ā ┬Ā hosts:
┬Ā ┬Ā ┬Ā ┬Ā gw.mydomain.com:
┬Ā ┬Ā ┬Ā ┬Ā ┬Ā ansible_connection: ssh
┬Ā ┬Ā ┬Ā ┬Ā ┬Ā ansible_user: "root"
┬Ā ┬Ā ┬Ā ┬Ā ┬Ā ansible_ssh_pass: "yourrootpassword"
┬Ā ┬Ā ┬Ā ┬Ā ┬Ā ansible_ssh_private_key_file: "~/.ssh/id_rsa.pub"
┬Ā
Here is the playbook that logs into the UDM Pro and checks to make sure certificates are up to date, restarts unifi-os if needed (udmpro_update.yml).
---- hosts: udmpro┬Ā gather_facts: no┬Ā become: no
┬Ā tasks:
┬Ā ┬Ā - name: Copy *.mydomain.com certificate file┬Ā ┬Ā ┬Ā ansible.builtin.copy:┬Ā ┬Ā ┬Ā ┬Ā src: /home/ansible/certs/mydomain.com/fullchain.pem┬Ā ┬Ā ┬Ā ┬Ā dest: /mnt/data/unifi-os/unifi-core/config/unifi-core.crt┬Ā ┬Ā ┬Ā ┬Ā owner: root ┬Ā ┬Ā ┬Ā ┬Ā group: root┬Ā ┬Ā ┬Ā ┬Ā mode: '0644'┬Ā ┬Ā ┬Ā ┬Ā backup: true┬Ā ┬Ā ┬Ā register: cert
┬Ā ┬Ā - name: Copy *.mydomain.com key file┬Ā ┬Ā ┬Ā ansible.builtin.copy:┬Ā ┬Ā ┬Ā ┬Ā src: /home/ansible/certs/mydomain.com/privkey.pem┬Ā ┬Ā ┬Ā ┬Ā dest: /mnt/data/unifi-os/unifi-core/config/unifi-core.key┬Ā ┬Ā ┬Ā ┬Ā owner: root┬Ā ┬Ā ┬Ā ┬Ā group: root┬Ā ┬Ā ┬Ā ┬Ā mode: '0644'┬Ā ┬Ā ┬Ā ┬Ā backup: true┬Ā ┬Ā ┬Ā register: key
┬Ā ┬Ā - name: Copy java keystore┬Ā ┬Ā ┬Ā ansible.builtin.copy:┬Ā ┬Ā ┬Ā ┬Ā src: /home/ansible/certs/mydomain.com/keystore┬Ā ┬Ā ┬Ā ┬Ā dest: /mnt/data/unifi-os/unifi/data/keystore┬Ā ┬Ā ┬Ā ┬Ā owner: 902┬Ā ┬Ā ┬Ā ┬Ā group: 902┬Ā ┬Ā ┬Ā ┬Ā mode: '0640'┬Ā ┬Ā ┬Ā ┬Ā backup: true┬Ā ┬Ā ┬Ā register: keystore
- name: Restart unifi-os if neededcommand: unifi-os restartwhen: cert.changed or key.changed or keystore.changed
┬Ā
That playbook is called via cron once per day and makes sure the most recent letsencrypt certificate is installed on the UDM Pro.
┬Ā
MacOS - change account to admin from command line
- September
- 19
Had to do this today so thought I would share.....
┬Ā
dscl . -append /Groups/admin GroupMembership <username>
┬Ā
You need to be root or use sudo.
Create a RAID 10 on Mac OS (Monterey)
- July
- 31
I had four WD RED 4TB drives and wanted to get better performance out of them with a mirror but also wanted the ability to replace a drive if (when) one failed.
┬Ā
Indications from online searching said I could create either a RAID 10 or 0-1. I'm not sure if one is better than the other. I went with the 10 configuration since I'm already familiar with that on my TrueNAS.
┬Ā
Trying to do this from the Disk Utility always failed with an error message saying the RAID couldn't be created. The only type of array I was able to create out of two mirrored pairs of drives was a concatenated array. That still gave errors but appeared to have worked. But that's not going to give me any performance benefit.
┬Ā
Instead, the solution is to do everything from the command line. So here we go....
┬Ā
By the way, my disks are in an external cabinet attached via Thunderbolt 3.
┬Ā
The four disks are disk2, disk5, disk6, and disk7 (use 'diskutil list' to find yours). Make sure you get the correct disks as they will be repartitioned and reformatted.
┬Ā
Let's create the first set of mirrors from disk2 and disk5. I named the set vdev0.
┬Ā
# diskutil createRAID mirror vdev0 JHFS+ disk2 disk5
┬Ā
Now we'll create the second set of mirrors from disk6 and disk7.
┬Ā
# diskutil createRAID mirror vdev1 JHFS+ disk6 disk7
┬Ā
Now do a 'diskutil list' and find the disk numbers of the newly created mirrors. Mine were disk8 and disk10.
┬Ā
Finally, create the striped set of mirrors. I named mine WDRED.
┬Ā
# diskutil createRAID stripe WDRED JHFS+ disk8 disk10
┬Ā
That's it. if you do a diskutil AppleRAID list you'll see the two mirrors and also the striped set which should now be mounted.
┬Ā

