Wahoo KICKR
- December
- 23
I was fortunate that I had a big expense reimbursement this month and also three paychecks in December so I gave myself a Christmas present early and bought a Wahoo KICKR. Performance had a $50 off coupon and had one in stock in their Delaware store so no state sales tax. I also got Performance Points of 10% so my net price was $945.
Now I wasn't completely dissatisfied with my previous setup, in fact I had purchased the Kurt Kinetic InRide power sensor and the pro flywheel recently. That combination really made my Kurt trainer work well with TrainerRoad instead of using their Virtual Power feature. The trouble is that when I'm training I really don't want to have to think about too much other than riding my bike. Having to watch (and match) the required power output by shifting gears all the time was somewhat of a pain although I did feel I was getting a good workout from the setup. Adding the KICKR meant that I could ride more naturally and worry less about controlling things.
There are lots of reviews out there on cycling trainers and I read way too many of them. But I wanted to end up with something really neat that overcame the problems I had with training indoors. Mostly I wanted to overcome the boredom of endless sweat soaked mindless spinning that I've come to identify indoor training with. Using a smart trainer along with software has let me overcome this and I can say that I actually look forward to my indoor workouts now.
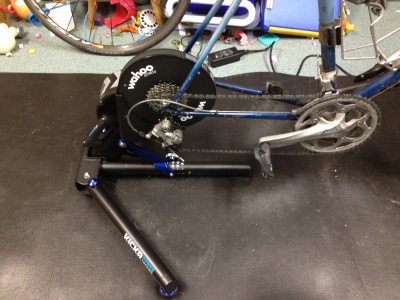
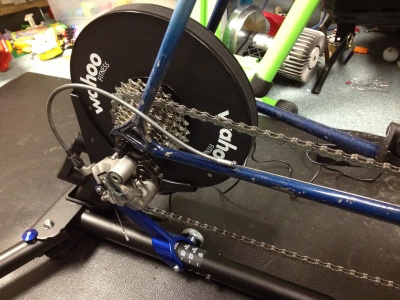
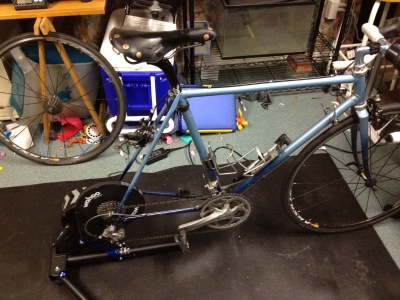
The things I like about the KICKR are that it is built solid, you still ride your road bike but remove the rear wheel so no tire wear, it is both Bluetooth (4.0) and ANT+ and they have an open API so that software developers can integrate it into their products much more easily than some of the more proprietary systems.

You can read the full review of the KICKR on DC Rainmaker's blog if you're interested, he covers everything in excruciating detail. I'll merely add my comments to his and validate or expand on some of the things he mentions.
First of all, this thing is very heavy. I certainly wouldn't want to drop it on my foot or I won't be riding for a while. Since I have no intention of using this thing anywhere else but my home that works out fine. I'll keep my Kurt trainer in the car for race warmups of course. Having worked with mechanical devices for many years, I really appreciate the craftsmanship that went into the KICKR.
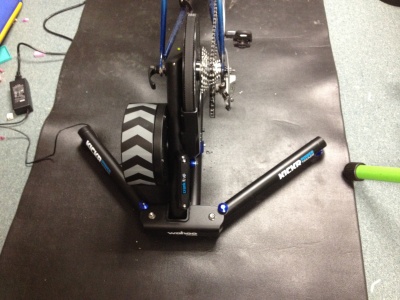
There is no part of it that seems cheap or underengineered. You can adjust it for bikes with different wheel sizes and the fold out legs have micro adjusting feet to keep the trainer from wobbling if the floor isn't perfectly flat. I also like that my bike sits right on the floor, no riser needed for the front wheel. So it's easy to get on and off.
The KICKR worked right out of the box with the Wahoo app on my iPhone 4S (the oldest Apple model that has Bluetooth 4). I used the phone app as a first step because you need that to do any firmware upgrades. Turned out there weren't any upgrades required but there were some newer beta releases (careful) out there which require a secret swipe pattern on the phone to access. I have one of the stable betas on there now but I don't think it's any different than the software that the KICKR shipped with.
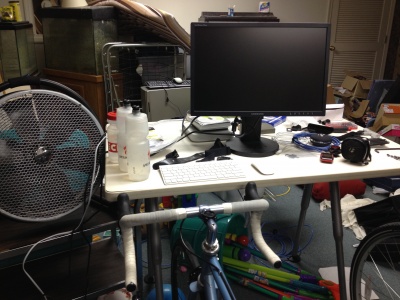
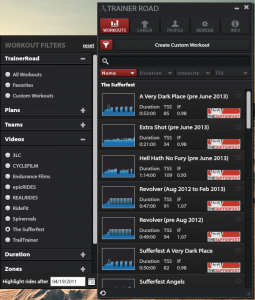
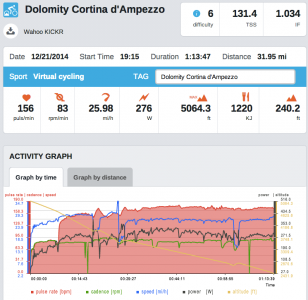
Of course the real fun started when I paired the KICKR up with TrainerRoad. Running the TrainerRoad application on my Macbook Air with a Garmin ANT+ USB stick (I already had one from my Garmin Vivofit) worked perfectly. It discovered the trainer easily. I had to 'unpair' the previously used InRide sensor from the Kurt trainer so it wouldn't be used anymore.
Of course my heart rate sensor (Scosche) was already paired as was my Garmin cadence/speed sensor which now would be used for cadence data only since there is no rear wheel on the bike anymore; your speed data now comes from the KICKR which it can calculate easily since it knows the RPM of the flywheel and the circumference of a 700C wheel.
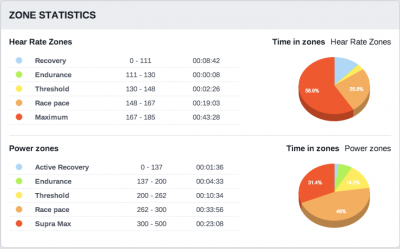
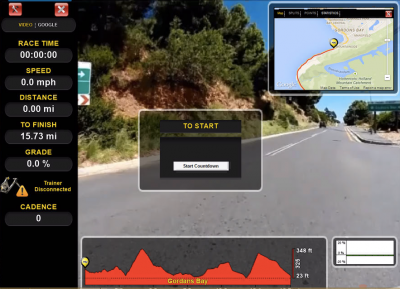
While we're on the subject of speed, some explaining is in order. TrainerRoad defaults to ERG mode for the KICKR. What that means is that the TrainerRoad software tells the KICKR how many watts are required and the KICKR then adjusts the resistance in order to generate that many watts. As you know, climbing is generally at a slower RPM expecially out of the saddle. So in order to generate a certain wattage the KICKR will raise the resistance. Conversely, if you are spinning really fast simulating flat or downhill terrain, less watts per pedal revolution are required so the KICKR lowers the resistance. It seems a bit weird at first when you are riding because with a traditional trainer the watts will go up and it will be progressively harder to pedal as cadence is increased.
But since the KICKR lowers the resistance as you increase cadence it actually begins to feel easier to pedal as you pick up the crank RPMs. With that action going on you can really just leave your bike in a medium gear and just try to spin the cadence that the workout requires and the KICKR will auto adjust. But think about this; if you are in a really low gear on the bike, the rear wheel is not turning that many revolutions per revolution of the cranks so measured speed of the bike is low. If you are in a high gear the RPM of the wheel is higher per RPM of the cranks so measured bike speed is higher.
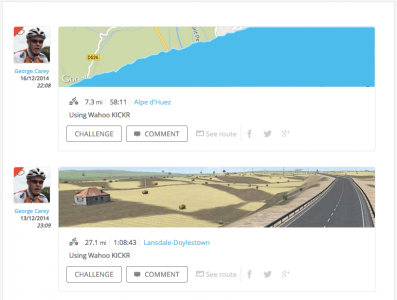
Because of this, when the trainer is in ERG mode (the default) you can disregard the speed you are going completely as it is meaningless anyway. Instead, you focus on the RPMs that the training program is asking you to do and of course be prepared to deliver the power that is required. If you use a lower gear on the bike your speed will look ridiculously low when you upload to Strava or somwhere else but you have to remember that it's the average power you were generating that is what you should be looking at. If you look at some of my workouts on Strava you'll see what I mean. This point about speed only concerns training done while in ERG (ergonomic) mode.
So TrainerRoad works well with the KICKR and will automatically force you to produce the correct power. That's pretty cool. But the real fun from the trainer is competing right? I don't think comparing my results on TrainerRoad with someone else really tells me much about my fitness. Maybe comparing my efforts with previous efforts does but who wants to race against yourself all the time?
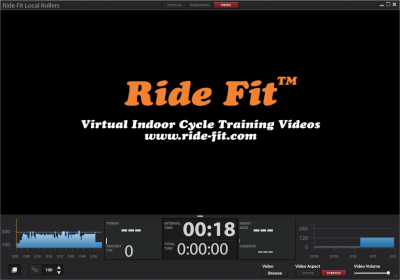
One nice thing about TrainerRoad is that there are workouts that sync with different training videos. That includes Sufferfest and a bunch of others. And if they don't have a workout for your particular video you can make your own. In fact you can play any video you want during your workout. I put on a video of last year's TDF during one session.
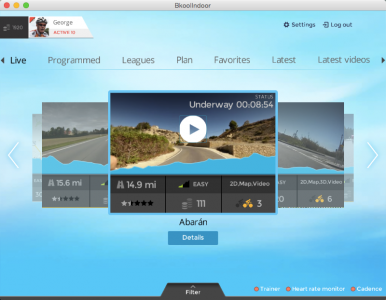
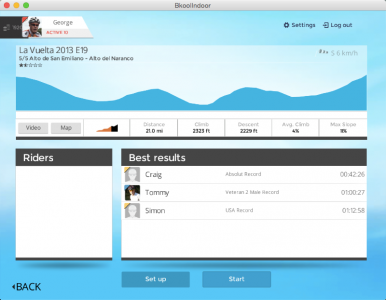
There are other online services that are centered around competition. So far I have tried two of them, BKOOL and VirtualTraining. BKOOL is the first one I tried. You can enroll monthly (I think it's $15 per month, cancel any time). They keep a repository of training route profiles some that have video and some that don't. They also have a 3D mode that looks cartoonish but let's you see the other riders (ghost or real) on the screen.
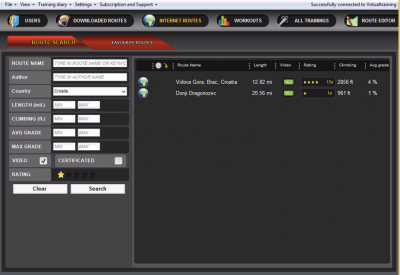
There must be thousands of routes on there and because it's based out of Spain there are great European classic climbs and race stages you can ride. The format is that there are ad-hoc races forming up every few minutes and you are welcome to join in one of those or create one yourself. Rides are classified by difficulty so you can choose what you want to do that day. While the BKOOL software works okay, their user interface is not intuitive at all. I still stumble around the software trying to get something simple done. But when it's running it works pretty well.
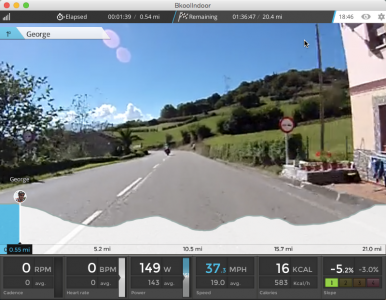
The one downside to BKOOL is the video. The quality of the videos is pretty good in most cases but they stream it to your computer and it always seems to hang. Maybe the servers are all over in Europe or something but I don't think I have ever done a session where the video streamed correctly. It usually starts out okay but at some point in the workout it starts failing. It will catch up (if it can) so you just keep on riding and hope that it fixes itself. BKOOL has a large base of participants and some really strong folks so the comptitive factor is very good.
BKOOL records your efforts and then you can download the .fit file and do what you want with it. Garmin Connect doesn't like the .fit files that come out of BKOOL so instead I import them into my Mac Rubitrack software and then export them as .tcx and they work fine on Garmin, Strava, etc. BKOOL supports several resistance based trainers and even non-resistance based ones. In fact you can ride without any sensors at all if you don't have any although I don't see the point in that.

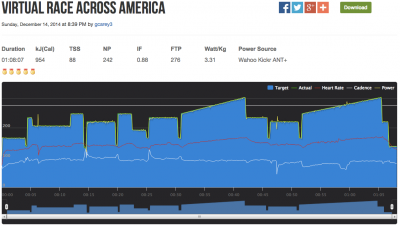
The other online racing software I've tried is VirtualTraining from CycleOps. It is also a subscription based service. While they are certainly interested in selling you a CycleOps trainer they fully support the KICKR. The nice difference between BKOOL and VirtualTraining is that VirtualTraining lets you download the workout including the video before you start. That means that Internet lag is not a factor for the video which is really nice. A few of the videos I've used still jump and pause a little bit. The user interface is better on VirtualTraining. And it seems they are continuing to develop things as I have already downloaded an update and I've only been running it a few days so far.
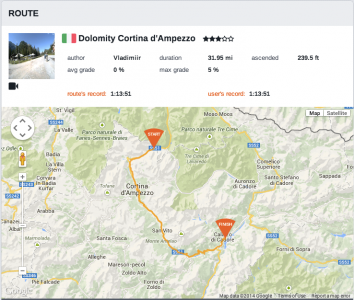
With VirtualTraining there is less of a focus on live competition although it's still available in the form of scheduled races. There are leaderboards for the routes and you can schedule and join races but it's not like BKOOL where the racing is right in your face on the main interface. Also, I've noticed an issue with local time. Although VirtualTraining support says that the local time will automatically match your computer, that isn't working for me. It's always three hours off as if it was Pacific time. So I'm wondering what will happen if I say I want to join a race. Will it be three hours off like the times on my rides? I don't know and so I haven't done any live racing on there yet. Instead I've tried several training rides that are available many which include video of various qualities. It felt really weird when riding in South Africa on the wrong side of the road with cars passing you on the right!
Some differences to note are that TrainerRoad videos simply play and you ride along. The videos on the other services follow your riding so the faster you go the faster the video plays and the sooner you're done. TrainerRoad goes by training time instead of distance. Also, VirtualTraining won't run natively on the Mac, it requires Windows. I run Windows 8.1 via Bootcamp on my Mac Mini and I can also fire up the Bootcamp partition under VMWare Fusion which seems to work okay too as long as I remember to share the USB ANT+ stick to the virtual Windows machine.
If you use Windows you're probably in good shape as all three of these have a Windows based client that works pretty good. You'll need a USB ANT+ stick and/or a Bluetooth 4 transceiver depending on your sensors. Also, TrainerRoad running under windows with BT requires a specific Bluetooth dongle, you can't use the one built into your PC unfortunately. I think the ANT+ will use any of the major ones like Garmin or Suuntu. I bought my dongles online mostly from Amazon.
Yet to try is Zwift which I hear is pretty cool, more of a virtual environment but high quality graphics. I haven't gotten my Zwift invite yet but I know that the folks at Zwift are doing their best to scale up their application and get riders started. Anyway it looks like it may be a cold winter but at least I'll have some fun training indoors this year.
Planning for the 2015 Cycling Season
- December
- 5
I thought I would write a bit about my intentions to perform better during next year's season as a way to remind myself of what my goals are. You see, I'll be racing Masters 55+ next year for the first time. That means I'm at the bottom of the age group again instead of the top. Not that the racing gets any easier, and of course everyone else is also getting older and I can expect to see some familiar faces in the field I'm sure.
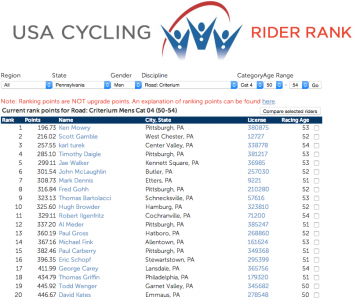
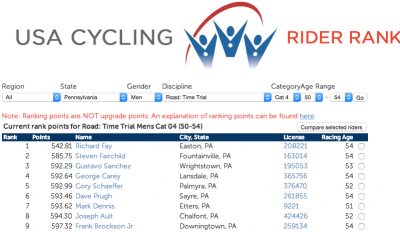
I made a good effort back in 2012 and was satisfied with my season overall. A total of about 26 races and ended up about 25th overall for Cat 4 in Pennsylvania for Road Race and slightly lower for Criterium. Not too bad for an old man. The beginning of the 2012 season I raced Cat 5 even though I probably could have gone straight to Cat 4 because of my previous racing experience in my younger days. Moving up to Cat 4 was eventually needed so that I could race Masters races, most of which are restricted to Cat 4 and above.
The last two years I have not raced as much, although I have still enjoyed the sport immensely. I had hernia surgery which affected my 2013 season quite a bit and then ended up breaking my collar bone in July. Although I was back on the bike quickly, there wasn't too much hard racing for me. Last year I did a few road races and a few local crits just to keep myself in touch with the racing community. I had fun but no great results. Still managed to keep my place in the crowd though. Looking at my age group I'm in the middle of the pack.

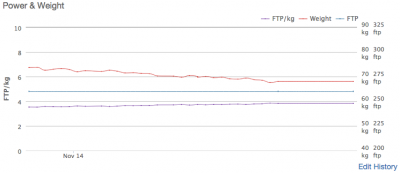
On club rides during the 2013 season I noticed that I struggled more on climbs than I think I should. Despite riding plenty of miles and training hard my climbing was my weak spot. In my younger days I was a great climber and used that as a strength so it is a bit disappointing to know that I can't do that anymore. But what has really changed since back then? Sure, my VO2 max and recovery are less than they used to be just due to aging. But the main thing is that I'm carrying extra weight up the hills. It's not as much of a problem on the flats or downhills but every extra pound I carry on an incline is painful.
Since my 2012 season I've become a bit lax with my diet. I think the main thing is that I train at dinnertime and then I'm famished when I get home so I eat a lot of food and certainly not the healthiest foods. Then I go to bed. Not a good combination. So the first change I am making is to try to eat a while before training and then be more moderate afterwards. I'm still hungry when I get home but I really watch what I eat. I try to stick to fruit and protein mostly.
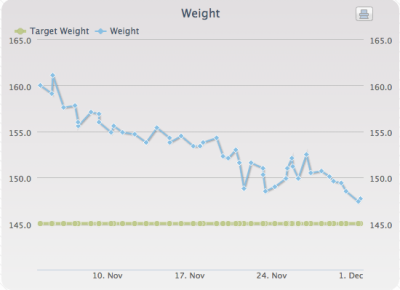
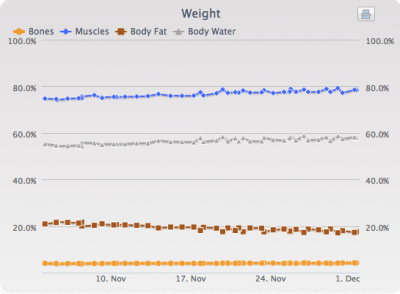
As far as my diet goes, I have a strategy that I will lose weight over the holidays which is more of an off-season and then not have to restrict my calories quite as much for training before the season next year. So far that's been going quite well, I've dropped about 24 pounds from October to the beginning of December. I'm probably going to level things out now and keep the caloric deficit more reasonable (maybe 500 kCal per day) and let my body adjust to the new weight.
Meanwhile, I'm putting together a good off-season training program. I've got my Kurt Kinetic trainer with the inRide power module hooked up. I've also signed up for TrainerRoad. I'm hoping that I can spring for a Yahoo KICKR if there ends up being extra money over the holidays. That would be a great way to simulate being outdoors. I still get out and ride but I have to admit that I'm riding less outside this year. I'm not sure I'm getting quite the workout inside since there are no real hills (just simulated) but I still feel the muscle burn after a hard trainer session so I guess I'm getting benefit. I also find it's easier to breathe inside with the warmer air so don't mind doing intervals quite as much. But one thing I've noticed is that I can more easily get my heart rate up outside than working on the trainer. I'm not sure exactly why that is but it just doesn't seem as painful to do it outside. Maybe it's just psychological. I'm certainly motivated by moving faster and you can see your progress when you are riding on the road.


The other tactic that I hope to use is to develop more muscle mass in my quads and thighs. In my youger years I had bigger legs, mostly from doing touring type rides with a heavy bike. I would slog up the hills for many miles a day. It didn't do much for my leg speed but it did get me strong and that strength meant that I could turn bigger gears and go faster overall. So I need a way to simulate that on the trainer or maybe even load up a bike with some weight and ride hills around here. The trainer would certainly be easier but I'm not sure I can completely capture the muscle movements without actually climbing since it involves body posture quite a bit.

So that's about it for now, we'll check in later when I've got my strength training underway. See you on the road.
Walmart online ordering issue
- November
- 1
Seems that Walmart is really screwed up with their online ordering. Look at what happened when I tried to order something to be shipped for local pickup at a FedEx office.
First, I recieved the confirmation of my order via email on 10/22.

Next, I received an email saying the items had been shipped. I checked on the website but there wasn't any tracking information yet of course. So I signed up for a text alert when the package was available for pick up.
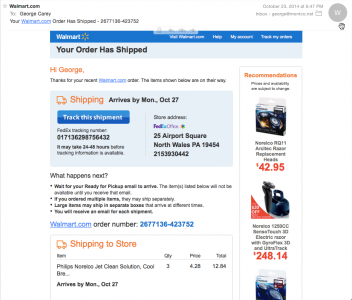
Then I received an email on 10/28 stating that my shipment had been delayed and they didn't know when it would be delivered. No big deal as I don't need the items immediately anyway.

After a few days of not receiving anything else I decided to check (today 11/1) to see what was going on with my order. I logged into walmart.com and clicked on the tracking link. According to FedEx the shipment had been sitting at the local FedEx office since 10/24 waiting for me to pick it up and was shipped back on 10/31.

I called into Walmart customer service and was told that my package was on its way and would be delivered around 11/5. I had to argue with the customer service rep stating that the package was actually on it's way back to Walmart, not to me. After some time she put me on hold and after several minutes came back and said that I was right. She then told me that I would have to wait until the shipment was received back at Walmart before I could be credited and that I would have to reorder the items.
Really? I have to reorder something when Walmart never even notified me they were here, not an email or text message?
Now I'm sending the URL for this blog into customer service. Let's see if they are interested in making this right or not.
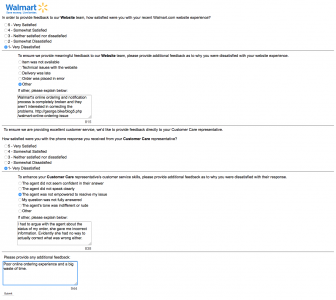
Funny, but I just got an email asking for my feedback on their customer service!
Abbey Bike Tools H.A.G.
- June
- 12
I put off buying a hangar alignment tool for some time. I guess I was convinced that I could eyeball the straightness of the derailleur without a tool most of the time. But my Opera seemed out of whack and was dropping the chain on the inside once in a while and I figured the time had come to make the investment in a proper tool for the job.
My first thought was to purchase the Park Tool DAG-2 which seemed reasonably priced. I've found most of the Park tools I own to be adequate for the task. But in searching the Internet for reviews I found there were other choices that might be better. You can research on your own if you wish but I finally settled on Abbey Bike Tools H.A.G. (Hangar Alignment Gauge).
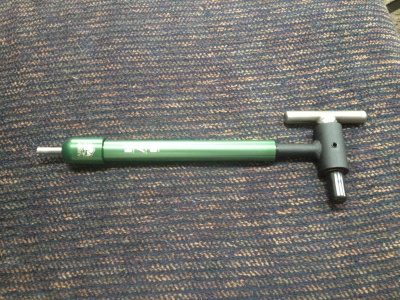
The tool was considerably more than the Park tool but I appreciate quality tools and this one is no exception. It came in a plain cardboard box so it assumes you know how to use it. For a bike mechanic it's pretty simple to figure out.

The tool itself is pretty compact. It telescopes out so that you can use it on about any size frame and wheel. Even when the tool is completely extended there is very little play. The inner piece of cold rolled steel, while not honed like a hydraulic cylinder, has been turned to provide a fairly tight fit inside the outer aluminum tube.
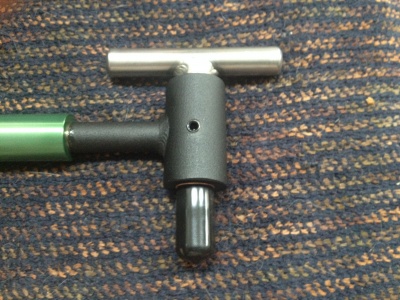

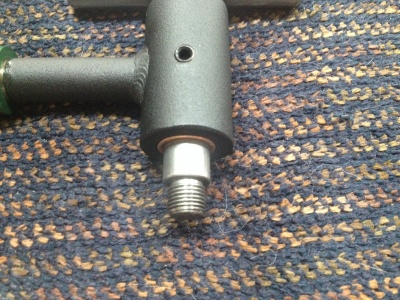
On the hangar attachment end there is a piece of tubing with brass bushings to hold things tight. The handle is also cold rolled steel and is tig welded on. A set screw holds the handle piece in place.

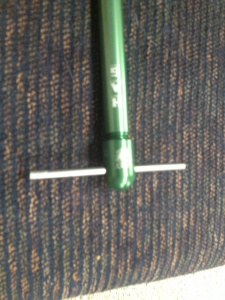
The other end of the tool has an aluminum cap which screws on. The feeler gauge stows in the end of the tool nicely and is removed and inserted horizontally through the partially unscrewed end cap while in use. Tightening the end cap holds the feeler in position as you rotate the tool around the circumference of the wheel during the measurement phase.
I liked that the tool was very sturdy. It doesn't take much pressure to make corrections in the alignment, just a little hand pressure did the trick in every case. The whole job took about 20 minutes including removing and reinstalling the derailleur and making sure the shifting was okay afterwards.
I would recommend the Abbey Bike Tools H.A.G. for any serious bike mechanic. The quality of the tool is impressive. I'm sure it will eventually be an Old H.A.G.
Racedots
- June
- 5
I received my long-awaited racedots last week. While I haven't had a chance to try them in a race yet, here are my initial observations.

