Change Dell iDRAC system name from Linux cli
- February
- 9
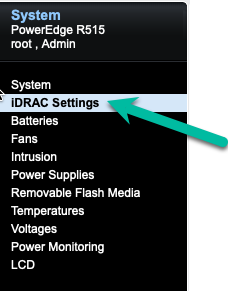
Make sure the shell interface is enabled through the iDRAC web interface. Log in and click on iDRAC settings on the left.
Â
Click on the Network/Security tab.
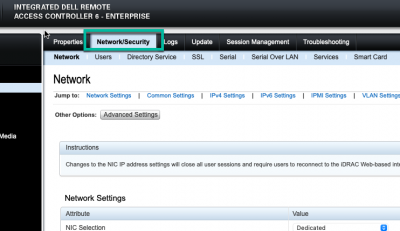
Scroll down and find the IPMI Settings. Make sure the Enable IPMI Over LAN box is checked.
Â

Â
Â
Install ipmitool on another device or your workstation, so for Ubuntu 20.04 I used:
Â
apt install ipmitool
Â
Convert the name you want to set into hex values. For that used:
Â
echo "new-hostname" | od -A n -t x1
Â
That will output the string as hex digits.
Â
Then you use the ipmitool command like this:
Â
ipmitool -H <ip-address-of-dell-host> -U <username> -P <password> -I lanplus raw 0x06 0x58 0x02 0x00 0x05 0x0d 0x6e 0x65 0x77 0x2d 0x68 0x6f 0x73 0x74 0x6e 0x61 0x6d 0x65 0x0a
Â
0x06 0x58 0x02 0x00 0x05 - this addresses the correct variable in the iDRAC, always the same.
0x0d - this is the number of bytes in the new hostname, in this case 13, in hex.
0x6e 0x65 0x77 0x2d 0x68 0x6f 0x73 0x74 0x6e 0x61 0x6d 0x65 0x0a - this is the hostname characters coded in hex from previous step.
Â
The example above therefore sets the system name to "new-hostname".
Â
Use Letsencrypt certs on Postfix and Dovecot with selinux
- April
- 7
I have my certificates mounted via NFS on all hosts so that it gives me easy access to them for services that use SSL. The workaround I was using for mail services was to mount like this (from /etc/fstab):
10.20.40.13:/mnt/tank/unix/web/letsencrypt /etc/letsencrypt nfs ro,context="system_u:object_r:postfix_etc_t:s0"
That solves the issue of context for selinux so that postfix can read the files. The issue is that I can't read those same files with dovecot. I had a cron going to copy the certs to /etc/dovecot dir but that was a bit of a hack. So today I dug into the issue and fixed it.
The solution is to add to the current selinux policy so that dovecot can essentially read postfix's files. I suppose it is slightly less secure that way but since they are both part of the mail system I think it's an acceptable risk.
So here is the TE file that I eventually ended up with that allowed dovecot to start successfully.Â
Â
Â
module dovecot_read_postfix 1.0;
require {
type postfix_etc_t;
type init_t;
type unconfined_service_t;
type dovecot_t;
class process siginh;
class filesystem remount;
class dir search;
class file { open read };
class lnk_file read;
}
#============= dovecot_t ==============
allow dovecot_t postfix_etc_t:dir search;
allow dovecot_t postfix_etc_t:file { open read};
allow dovecot_t postfix_etc_t:lnk_file read;
#============= init_t ==============
allow init_t postfix_etc_t:filesystem remount;
allow init_t unconfined_service_t:process siginh;
Â
Â
Freebie gift almost causes catastrophe
- September
- 16
When I renewed my Wired subscription I don't remember reading that I would receive a promotional gift. So it was a pleasant surprise to see an unexpected envelope in the mail. That was, until I opened it.
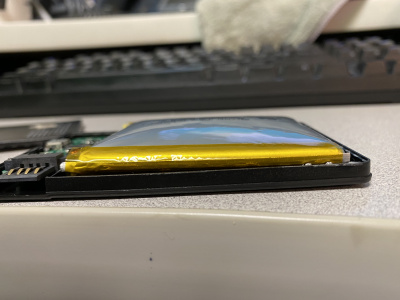
Inside was a battery power pack complete with charging cable. Looking at it casually, it seemed a bit deformed. After opening it I saw that the battery inside had expanded to the point that it broke the plastic outer housing.

I broke the remaining plastic apart so I could take a look at the battery itself. It was puffed up like a balloon.
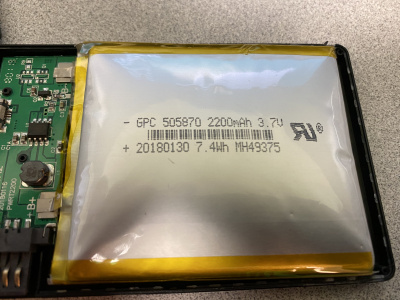
Needless to say, I'm glad this stupid little thing didn't explode in my face or burn down my house. If I'm reading the data code correctly, this battery was made two years ago. I'm going to do some additional testing to see if I can determine exactly what went wrong.
Â
Migrating a VM from ovirt to VMware ESXi
- April
- 16
I'm using ovirt 4.3x and decided to migrate some VMs to ESXi 6.5.
First thing to do is find the disk file. It can be found easily through the UI of ovirt-engine under Storage/Disks. That table shows the UUID of the folder that the disk is in.
Â
Get a shell on the ovirt node and find the file under /rhev/data-center/mnt/... somewhere probably. It's actually inside the directory that you found above. There are probably three files in there.
Â
Use the qemu-img tool to convert it from raw to vmdk like this:
Â
qemu-img convert -f raw d60c630e-4bc8-44ea-a842-1381f19993b4Â -O vmdk newdisk.vmdk -o compat6
Â
It will take a while.
Â
When done, move it to your ESXi datastore somehow (scp, whatever). Then shell into your ESXi machine, make a temporary directory and clone the disk like this:
Â
vmkfstools -i /vmfs/volumes/datastore0/newdisk.vmdk -d thin /vmfs/volumes/datastore0/newvm-dir/newdisk.vmdk
Â
Fix up the disk controller type in the new vmdk file, change it to lsilogic with your favorite text editor.
Â
cd newvm-dir
Â
vi newdisk.vmdk
Â
Now build a VM the normal way and attach the disk in ESXi. I usually build the VM and don't put any disk on it. Then I move the new disk file into the VMs directory, go back and attach the disk to the VM.
Â
You may have to 'rescue' the system and use dracut -f to get it to boot successfully with a new initramfs image. I generally attach an ISO CDROM and boot to it and use the rescue feature. I've found that CentOS needs this step, Ubuntu and FreeBSD don't seem to require it and happily boot.
Â
Although I haven't encountered this yet, I noticed that the last VM I built on ESXi 6.7 made the default boot EFI instead of BIOS. I think I would have to change the VM to use BIOS if I wanted to use the procedure above.
Fixing pending sector errors on FreeNAS
- January
- 17
I received an alert yesterday on my home NAS unit. It indicated that there was an increase in the number of "pending sectors." Looking into the issue, it's really an error writing to the drive which hasn't been addressed and relocated. So the sector might be bad or might be good. If the sector is written to again and fails, it will be relocated. If it's written to without error, the sector will be marked good again.
The way to look at the error counts and other statistics that indicate the health of the drive is by using smart tools. In this case it was the drive at /dev/ada3 which had the problem so I did:Â
# smartctl -a /dev/ada3The significant lines in this case are:Â
197 Current_Pending_Sector 0x0032 200 200 000 Old_age Always - 0
smartctl -a /dev/ada3SMART Self-test log structure revision number 1
Num Test_Description Status Remaining LifeTime(hours) LBA_of_first_error
# 1 Short offline Completed without error 00% 26304 -
# 2 Short offline Completed: read failure 90% 26301 48458008
# 3 Short offline Completed: read failure 90% 26301 48458008
# 4 Short offline Completed without error 00% 24742 -We had a successful test. So that will get rid of the FreeNAS alert. Just to make sure we are completely okay I'll schedule a scrub of that drive pool and look at the results. If there's any data corruption it should hopefully fix that up.
Â

