Zwift Group Rides
- January
- 27
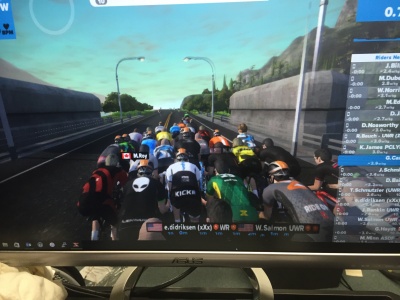
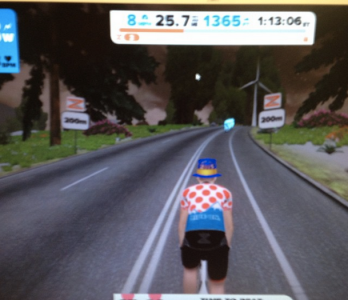
With the cold and snow here in Philly I've been doing plenty of riding on Zwift lately. When I started out using Zwift I was very content to ride solo especially during the beta phase when it was more difficult to match the pace of other riders and drafting didn't work very well. These days it's not uncommon to see several hundred people riding around Watopia at any time of day or night. You can easily find someone who is putting out about the same power as you are and usually other riders welcome the company.
Â
I've also tried a few "group" rides on Zwift. Basically you show up at the start/finish banner, don the recommended jersey (not all riders do this), add some letters to your name to identify yourself as a member of the group (again, not all do it), and wait for the leader to start sending group texts so everyone starts at the same time and maintains the correct pace.
Â
While it's kind of fun to see myself riding along in a big pack of riders reminiscent of past season road racing, there are some challenges with group riding on Zwift. I'm sure these challenges have not gone unnoticed by Zwift development staffers and I'm hopeful that they will give them the excellent attention that they have also devoted to other features within the app. Meanwhile, here is a view from my perspective:
Â
Identification - It's somewhat difficult to discern who you are supposed to be riding with. As a workaround ride leaders have requested donning a particular jersey or adding certain letters to your display name as a way to indicate that you are on that group ride. Not an ideal solution. Some people just don't do it and can't say I blame them much because at the very least it's inconvenient to have to go clicking through screens in the app setup. The jersey idea is a good one if it could be quicker and easier to do. If not a specific jersey for a ride, perhaps a bib instead? That would be really cool.Â
Â
As far as adding letters to your name, I think that is a bit of a hack. A more sophisticated way to present the names in the right-hand pane would be to use a unique background color for riders in your group or something along those lines. Â I'd also like to see the ability to do some filtering in the user pane so that only your group riders would show up perhaps. Watching the names on the rider list flip around while waiting for riders to catch up or a ride to start is bound to give me A.D.D. eventually. And it would also be nice to have a keystroke that would return my view to myself easily instead of having to find myself in the list and click.
Â
Communication - Although I consider myself to be a descent multi-tasker, I find it difficult to type and bike even with my new Wahoo Fitness Desk. I have heard some folks comment on speech-to-text apps, haven't tried those yet but at least that would keep your hands on the handlebars more of the time and less sweat dripping down into the keyboard. TeamSpeak seems like a good approach and is certainly more natural. Only issue is that it is a third-party app so you have to start it up seperately. Thinking out of the box a bit, if voice could be integrated into the Zwift app it would be really cool to relate the volume you hear to how close the rider is. That way you could yell out to people nearby just like you would on the road. Maybe the leader could override so everyone could hear him/her. That would do away with some of the complexities of the TeamSpeak app like private channels and such.
Â
Exclusivity - You can jump into a group ride or a race without any type of invite. Is this a feature or a challenge? Depends on your point of view. For a group ride I could care less. But if there are people off the front in a race and someone decides to pull them for a few minutes that's not good etiquette. Along the thoughts of eventual scalability of the app maybe races could have there own race course without any other riders on it. Not sure developers thoughts on this but most other online games have followed this model as the number of users grows past the capabilities or asthetics of a single environment.
Â
Graphics - First, I have to comment that the graphics work on Zwift has been excellent! It does seem odd though that you can sprint right up into a big pack of riders and end up on the front. It's like there is no yellow line rule. Not exactly a real racing scenerio. Maybe the algorithm could be tuned a bit so you could actually get "boxed in" and such. That would be more realistic for a race. For a normal group ride probably doesn't matter too much.
Â
Trainer Differences - I can imagine how hard it must be to try to keep everything fair for everyone. So many variables that are beyond the control of developers especially when using old-style trainers without power control. I seem to notice that things are a bit better than they used to be; assuming things are being tuned up within the software to flatten things out. But I still see the occasional person pushing incredible wattages or beating my sprint in half the time. I would also think that it may be difficult to stay with a group if you are on an old-style trainer as I have seen wider fluctuations in power from riders using that equipment.
Â
The good thing out of all this is that group riding is possible whenever you have the urge to jump on the bike and ride. You can meet people from all over the world and then drop them. I've been pretty impressed with the demeanor and courtesy of Zwifters; hopefully this is a reflection of those qualities in the cycling community at large. I'm hoping Zwift continues to be successful and doesn't attract the types of individuals that like to bully, cheat or deny service to others; some of the issues that have arisen in other gaming communties.
Â
Happy Zwifting!
Pain Cave Upgrades
- January
- 22
Â
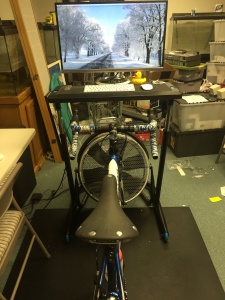
My basement pain cave is working out pretty good this year. Â I find I'm getting a better aerobic workout than riding outside; at least that's the excuse I'm using for not going out in the cold as much.
Â
The first enhancement was to remove the flimsy trainer mat that I originally got with my Kurt Kinetic road machine and replace it with something more durable. After scouring the web for suggestions and reading all the reviews on what people have tried I ended up going with a very inexpensive solution that is working out well. I purchased a stall mat from Tractor Supply Company. It's made from recycled rubber (probably tires) and is 3/4" thick. The 4 x 6 foot piece lays completely flat on the floor, does not move, buckle or puncture unlike the thin excuse for a trainer mat that it replaced.
Â
There are a few caveats though. First of all, this thing is very unwieldy to move around. I didn't weigh it but it could easily be 80-100 lbs. It doesn't like to be rolled or folder very easily either. So moving this thing around is a real challenge. I did manage to get it into my basement by first rolling it up outside and putting some tiedown straps around it to hold it (without them it would just unroll immediately). Then I strapped it to a hand truck with a bungee cord and wheeled it into the house. If I didn't have the hand truck I would have needed help from someone to move it for sure.
Â
The second issue is that it smells a bit. It's kind of like having a bunch of new tires sitting there. The smell doesn't really bother me in any way other than it's noticeable when I'm nearby. When I'm working out I don't really notice it that much as I'm concentrating on other things. I suppose with time the odor will decrease somewhat. Maybe I could have washed or coated it when it was still outside but I'm not hauling it back out there to try that.
Â
So now I have an extremely stable floor for my pain cave. It is impervious to sweat and anything else that might get spilled on it and it holds up well to the heavy weight of the trainer and impressions from my desk chair when I'm using the computer for other purposes (like now). I'm so glad I got this mat. The other one was driving me nuts between moving around and refusing to lie flat. I even put a small hole in the old one with my chair leg because the rubber is so soft. Maybe I'll keep it for doing core exercises or something like that. I could see getting another stall mat and increasing the workout area a bit so that I could use free weights. Maybe next year.
Â
The second enhancement for this year is the addition of a Wahoo Fitness Desk. Although I have been using a desk that is adjustable in height, it wasn't really suited to the task. I couldn't move it and it also didn't adjust high enough that I could position it over the handlebars to reach the keyboard and mouse. I bought the Wahoo desk with a little hesitation because the pictures showed someone using a laptop with it. I use a nice big 27" diagonal monitor for my workouts. The desk is not real wide and I wasn't sure there would be enough room for the monitor and keyboard. More on that later.
Â
So this desk is very well designed and built. It is built of 12 gauge steel tubing so it's very durable. It went together easily with a few hex keys. It has three wheels on it so you can actually push it out of your way or pull it closer while you're riding. I personally found it rolled a bit too easy so I usually put something in front of the middle wheel so it doesn't go anywhere during use. It looks like it would be easy to remove the wheels too if you wanted it more stationary.
Â
The desk is very adjustable in height. You push down a button at each end of the desktop and you can adjust the height up and down. It's a little harder to adjust it in the upward direction with a monitor on it but it works. The center of the desk has a non-slip rubber mat. That keeps stuff from sliding around (or off) when riding. The keyboard doesn't move at all. My optical mouse works on that surface too, although it is not easy to slide. I may put a smoother mouse pad on the right side eventually.
Â
I should comment that the height adjustment of the desk does not allow it to drop as low as a normal working desk height. The desk is designed to work from an elevated (training or standing) position. I still use my normal desk for other work so it's not a problem having a secondary monitor up on the higher desk. I don't think I would be comfortable using the Wahoo desk as a normal desktop unless I got a higher stool to sit on or something.
Â
The other features of the desk that are handy are that it has a groove in the front and back that you can fit your tablet or cell phone in. There groove width is variable between two sizes so hopefully your phone will fit one of them and be at a good angle for viewing while you ride. My iPhone 6 with waterproof case fits into the wider segment of the grooves. If you have a really thick case your phone may not fit though as mine fits a little snug.
Â
The other nice thing is that there are loops for power cords on the back. That keeps the cords routed to the side and out of the way. There are also holes under the grooves so that a charging cable for your phone, tablet or otherwise can pass through to the device. Very nice.
Â
As far as the width of the desk, it turned out to be a little too narrow for me to set it up the way I wanted with the monitor in the center and the keyboard directly in front of me. So I had to make a small modification so that it was more stable with the monitor sitting way back on the desk (actually hanging off the back a bit). Although the monitor would sit back that way okay I didn't feel it was stable enough to stand up to desk movement. The center of gravity of the monitor was very close to the edge and it wouldn't take much to send the monitor to the floor. What I did was to make two small holes in the desk and used a heavy-duty wire tie to strap the monitor down. That little extra bit of assurance was all that was needed. So now the screen is toward the back of the desk and the keyboard fits nicely in front. Plenty of room on the sides for anything else I might want to keep handy too.
Â
Turns out that the desk is just wide enough to allow me to put my fan underneath and aim it slightly upward to get plenty of air. That was always a drawback with the other desk.
Â
I've done a few workouts so far with the new setup and I'll probably tweak a few things as time goes on. For now I am really pleased how everything came out and it just makes my indoor workouts that much more enjoyable.
Â
See you all on Zwift!
Â
George
Apple Mini (Late 2014) SSD Upgrade
- December
- 11
I've been wanting to boost the performance of my Mac Mini for some time now. Running some benchmarks showed me that my i5 processor was certainly worthy but the main bottleneck was disk i/o. Having a 5400 RPM hard drive was the weak spot.Â
The first thing to do was figure out what tools I needed to open the machine and also what kind of drive I wanted to put in. I settled on getting a 1TB Samsung 850 Pro SATA drive from Amazon and purchased the appropriate tools from iFixit.
I also purchased a new drive sled from applecomponents.com that included the special Apple proprietary drive cable in case I ever wanted to add a second PCIe drive. They are a bit pricey right now but they will certainly get cheaper.
Following the iFixit guide worked out perfectly. The only extra thing I had to do was remove the IR sensor and cable from the old drive sled and mount it on the new sled. Had to pay attention to getting the cable end connector lined up in the right direction so it would snap back onto the motherboard properly.
I used CarbonCopy cloner in order to copy everything from the original drive (now mounted externally) back to the new drive. It took about 5 hours to do it.
Here are the benchmarks that I ran from my Windows Bootcamp partition before and after the upgrade:
Prior to upgrade I had a 5400 RPM spinning disk. Performance was pretty poor as you can imagine.

After the upgrade and using the Samsung disk utility to boost the performance I did another test.

I couldn't be more pleased with the outcome. Both Mac OSX and Windows are so much more responsive now. One additional note, I had to manually enable TRIM on OSX. It won't turn on natively with a non-Apple drive.
Chickpeas with Tomato and Spinach
- May
- 23

Chickpeas with Tomato and Spinach
Ingredients:
2 cups dried chickpeas
1 teaspoon tumeric powder
6 Tbs oil (I use canola)
6 medium roma tomatoes diced
1 large yellow onion diced
4 cups packed fresh spinach
1/2 cup water
1 teaspoon cumin seeds
1/2 teaspoon methi seeds
1/2 teaspoon coriander seeds
1 bay leaf
8 dried red chilli peppers
Pinch aesofotida
1 teaspoon garam masala
2 teaspoons salt
Few sprigs of fresh cilantro (coriander)Â
Â
Method:
Soak chickpeas overnight. Discard the water from soaking and place the chickpeas in pressure cooker. Cover with water plus about 1-1/2 more, about 8 cups. Add turmeric. Heat on high until steaming, reduce heat to medium low. Allow to cook at pressure for 12 minutes. Remove heat and let pressure reduce naturally.
Â
For seasonings and vegetables heat the oil in a skillet or wok until a cumin seed crackles when dropped in. When hot add the aesofotida, cumin seeds, methi seeds, coriander seeds, bay leaf and red chilies. Stir for one minute. Add diced onion. Cook over medium high heat until onion starts to turn translucent. Add diced tomatoes. Cook for another few minutes until tomatoes are softened. Reduce heat, add 1/2 cup water and fresh spinach. Cover. Allow to steam and spinach will reduce and become tender. As the spinach volume reduces, stir it in with the spices.
Â
Drain chickpeas retaining some of the juices. Add the vegetable mixture and enough of the juice back in to get a soupy consistency. Add salt and garam masala. Simmer everything together for about 20 minutes to mix the flavors.
Â
Garnish with fresh cilantro. Serve with rice or naan.
Zwift Beta
- January
- 1
Â
I finally got my invite to join the Zwift beta program on Christmas Eve. Since I was just starting the Rapha Festive 500 Challenge on Strava I decided to wait a little while before I checked it out because I knew that I would push myself a bit once I got started and I didn't want to be riding inside when I should be outside.
Â

Â
I finished the Rapha challenge in six days. Because of a health issue I'm staying indoors for a while so the timing is right to give Zwift a try. Since I received the beta invite I also received an invite to test the IOS app that works in tandem with the Windows program.
Â
Â
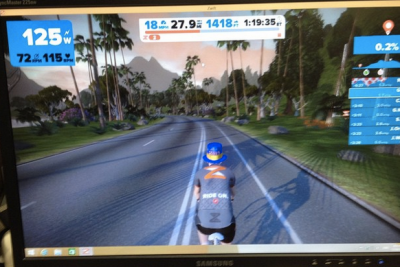
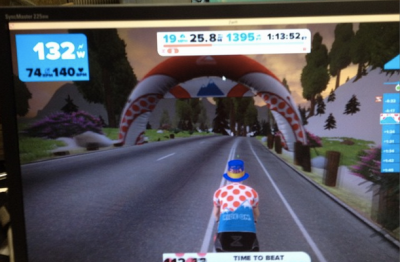
Zwift is pretty basic right now, you log in, configure your sensors, customize your look and bike a bit and join right in. Once you're riding you can just spin around or you can try for the orange, green, or polka dot jersey.
Â
Â
Everything went very smoothly for me on the first ride. I got the polka dot jersey and held it for quite a while. The bad part was that when I lost it the person who took it away beat my time by an incredible amount leaving me wondering if he was cheating or whether his equipment just wasn't operating correctly. His time was about half of mine on the climb. Similarly, on my second ride someone took the orange jersey from me with a time that was about a third of mine. I'm not sure how the Zwift folks are going to address that sort of thing yet.
Â

Â
While you are riding the time changes much quicker than real life. And there is lots of scenery to look at. There are lots of butterflies flying around (too many in my opinion) and a few deer that just stand there while you whiz by.
Â
There are several different views you can switch to while you are riding. The iPhone app has a button that lets you switch them easily from the bike. The only one missing from the videos I've seen onlin is the helicopter view. Maybe they are still working on that one.
Â
The number of people riding is variable. I have seen as few as 5 people on and as many as 15. There are also plenty of AI riders that you can ride with. They're the blue outlines you see in the photos.
Â
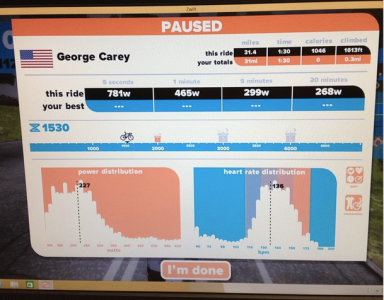
One issue I ran into on my second ride was that I stopped for a minute and then started pedaling again which should have just started me riding again. Instead the program crashed. I had to go back in. It saved a fit file but it wasn't closed properly so Strava complained when I uploaded it - it still was okay though. The bad thing about this was that I lost the experience points that I had accumulated and also my award for hitting 800 watts (which I did again on the next session).
Â
Although it's possible to draft other riders I don't feel any benefit in the power requirement while doing it. And it's very difficult to stay the correct distance behind another rider, AI or real. I always seem to be riding up next to them or an AI rider suddenly comes by me quickly. It's much harder to draft on Zwift than in real life. They will need to work on this if it's going to be any type of a training tool.
Â
Â
So overall I classify this as as fun and somewhat motivating but definitely not a serious training tool yet. Knowing the background of the founder I can expect that they will be working on making it better as time goes on. And word is that they are working on a Mac version which will make me happy since I won't have to run Windoze to use it.

